Thursday, August 30, 2012

Twice Baked Potatoes

The traditional part of me always wrap each individual potato in aluminum foil whenever I make baked potatoes. I'm not sure when this technique grew out of tradition, but it seems like an obsolete practice nowadays. Well, if I can save a 12" x 8" piece of aluminum foil for each potato I bake, I am going to make baked potatoes sans aluminum foil too! And guess what? I saw no evidence of any disadvantages doing it this way. Thumbs up to saving aluminum foil! ;)

I now prefer baking potatoes without blanketing them in aluminum foil and I will get to why a little later. Before we continue, I should throw in here somewhere (for the first time after the title of the post) that this post is about twice-baked potatoes. Talking about [once] baked potatoes is relevant because it's a necessary step. Here's the real deal...

Base:    Potatoes (I used 9 small-medium sized Idaho potatoes)
Flavor: A drizzle of oil (~ 1/2 tsp.)
             A dash of salt + 1/4 tsp.
             1/2 tsp. black pepper
             1/2 cup milk (whole, 2%, 1%, whatever you prefer)
             6 1/2 tbsp. butter
             1/2 cup chopped ham
             1/2 tsp. paprika
             1 tsp. parsley flakes
             1 1/2 - 2 cup shredded cheese (I used Mozzarella)
Heat:    Bake

1.Thoroughly wash the potatoes
We are eating the skin, so give 'em a good scrubbin' to rid 'em of unappetizing grime.

2. Dry the potatoes
More than casually, but less than thoroughly is a-okay.

3. Prep the potatoes like we are to make baked potatoes
- Line a baking sheet with aluminum foil (I know earlier I talked about saving aluminum foil without individually wrapping the potatoes, but we'll need this aluminum-foil-lined baking sheet later anyway).
- Spread out the potatoes on the baking sheet.
- Tip: using a fork, pierce each potato multiple times to allow them to breathe (the oven gets steaming hot ya know).
- Drizzle a little oil over the potatoes.
- Throw a dash of salt over the potatoes.
- Gently rub the potatoes to ensure even coating.
     - Tip: use a disposable plastic glove to avoid getting your hand(s) oily.
- Bake in a pre-heated oven at 350 degrees for ~ 1 hour or until tender (I left them in there for 1 hour and 10 minutes).
* If you only wish to make baked potatoes, thus this is your final step, cook a little longer so they are more tender.


This is why I now like making baked potatoes without wrapping them in aluminum foil: the thin coating of oil and salt gives them a beautiful golden exterior. It also keeps the exterior moisturized and tasty.

4. Prep the potatoes like we are to make potato skins
- Cut each potato in half lenghtwise.
- Trick: shape, dig, and scoop-- using a spoon, make out the shape of the potato from the inside. Then dig into the meat of the potato. Then scoop out the goods (place into a large bowl).
- If there's excess potato meat left inside the potato, scrape it out with the spoon (apply intensive care to avoid breaking the potato).

5. Prep the potato meat like we are to make mashed potatoes (loaded mashed potatoes)
- In the large bowl with the potato meat, add in the milk, butter, salt, pepper, paprika, and parsley flakes.
- Using a potato masher (or a fork), mash the potatoes, and the ingredients into the potatoes (mash longer if you want the potatoes smoother, mash shorter if you want it chunkier).
- Add in the ham and ~ 90% of the cheese.
- Using a spoon or spatula, mix everything together.
- Tip: taste-test the mixture and add additional amounts of the ingredients if necessary (e.g. larger potatoes with more meat might need more salt, milk, butter, etc,).

6. Stuff the naked potato halves
- Liberally: pile spoonful after spoonful of the stuffing and build a mountain.
- Conservatively: give the potato halves a fugal amount of stuffing.
- Adequately: in between liberally and conservatively.
* Extra stuffing can be saved to enjoy mashed potatoes (loaded mashed potatoes-- yum).
- Spread the remaining cheese on top of the prepped potatoes.
- Optional: garnish with black pepper.

7. Bake the filled potatoes
- Pop 'em back into the oven and bake at 350 degrees until the cheese on the top melts and has a little browning on them (the inside of the potatoes will also be ready at this point).
- 15 - 20 minutes is a good time frame to keep in mind.


They should come out looking something like this.

Notes: there are many aspects of this recipe that you as the chef can change according to your personal preferences. For example, feel free to substitute ham for bacon or even green beans if you like. Bacon seems to taste good with everything, but will require more prep work; ham is more convenient and healthier. I usually use Colby Jack cheese when I make this, but since I worked with what I had in my fridge (Mozzarella cheese) I added the paprika and parsley flakes with the intention of giving the potatoes a hint of color. You can also substitute parsley flakes with chopped green onions (I just don't like green onions enough to include them in my twice-baked potatoes). I prepared this recipe according to my personal preferences. Please feel encouraged to adjust any part(s) of this recipe according to your personal preferences-- just don't deviate too much (baking the potatoes for 30 minutes in step 3 will result in very firm potatoes). Whatever you do, just make sure you have fun in the kitchen!

Watch my video and join me in my kitchen where everything is served with love.


♥ Yen

Tuesday, August 28, 2012

Get the Most Bang for Your Buck at Farmer's Markets

I've been raving about how awesome farmer's markets are, and I don't think I can stop it. I went to my downtown farmer's market this past Saturday-- not quite surprising, is it?


See, lots of people, lots of entertainment, and lots of booths.

In addition to reiterating the awesomeness of farmer's markets, and displaying the pictures I snapped on my most recent farmer's market trip, I want to share a couple of tips on how to get the most bang for your buck at farmer's markets.

1. If the farmer's market that you go to is open multiple days a week, go on the day(s) when it's the busiest

Find out which day(s) has the most vendors present. Thanks to technology, the internet makes this easily accessible, unless your farmer's market doesn't have a website... which would mean they are lagging behind on technology-- even I have a website. Haha! In all seriousness, if this information is not available on the web, ask the vendors or the information booth at your farmer's market directly.

Reason: more vendors = more competition. More competition = more selection. More selection = lower prices. Here's a great analogy... I was watching an episode of The Great Food Truck Race on the Food Network the other day. When the competing teams had the freedom to park their trucks and serve customers at a location of their choosing, they were charging each menu item with whatever dollar amount came to their minds at the start of the competing day-- talk about monopoly. When the competing teams were forced to battle bumper-to-bumper on the same street with all the teams, competition forced the teams to slash prices to beat the other competitors' prices. This form of competition in economics theory also applies at farmer's markets.

Example: my downtown farmer's market is open on Saturdays and Tuesdays (I have only shopped there on Saturdays). I went last Tuesday, and before going, I looked online to scoop out the vendors who will be present (mainly because I wanted to see which food booth I wanted to have for dinner). It did not take long for me to notice that the vendors present on Tuesdays only reflect a small fraction of the vendors present on Saturdays. I went anyway.

With less vendors, less competition, and less selection, the same crops available on Saturdays are marked up on Tuesdays (I went again the following Saturday to reverify). What I can purchase on Saturdays would cost me more $ on Tuesdays. If I can stretch out my dollar further on Saturdays, when more vendors are present, logic tells me I should avoid going on Tuesdays. Plus, more vendors = more to choose from. It also mean more food booths available! Thumbs up to win-win-win for the consumer!

2. Buy crops when they are at their peak, or immediately after

Example: at the start of peach season, peaches are still young and blooming. They are still superior to grocery store peaches: they taste better, and will usually still beat the prices of grocery store peaches. However, when peaches reach their peak, all the booths that sell peaches have much sweeter and cheaper peaches.

I started canning last year and I have become a crazy-canning lady. Unfortunately, my dinky porch is not conducive for harvesting any fruit trees. What a bummer. Since I have to rely on buying my fruit, and I now can a lot, waiting until the prices are more econmical is most optimal. Here's another area where you can stretch out your dollar at farmer's markets. Wait a little longer and snatch peaches when they are cheaper, and sweeter. Win-win scenario for the consumer :)


* Notes: All information is based on my opinion derived from my observations. What I see at my farmer's market(s) may not be a generalization of all farmer's markets. Make observations at yours and note the similiarities and differences. Happy shopping, and may you find lots of bargains at your farmer's market.


♥ Yen

Sunday, August 26, 2012

Asian Inspired Grilled Chicken (With a Hint of Coconut)

Chicken is the type of meat that my boyfriend and I purchase most frequently; chicken is the type of meat that I cook for us most often. I made this chicken dish the other day, and my boyfriend said it was the best chicken I've ever made him.


Soy sauce and brown sugar is a magical combination. I have used it many, many times to marinade chicken and pork. After marinading the meat, I love grilling them or cooking them in the oven. When I made it this particular time with the hint of coconut, it accentuated the magical soy sauce + brown sugar combination. It immediately became my boyfriend's favorite chicken recipe!

Base:   5 skinless and boneless chicken thighs
Flavor: 2.5 - 3 tbsp. soy sauce
            3 tbsp. brown sugar (not firmly packed)
            1 tsp. powdered garlic
            1 tsp. white wine vinegar
            1 tbsp. coconut oil
            3 - 4 tbsp. coconut flakes (optional)
            A pinch of salt and pepper
Heat:   Grill

1. Mix the soy sauce, brown sugar, powered garlic, white wine vinegar, coconut oil, salt, and pepper together
- Tip: marinade in a large zip-lock bag to save yourself from having to wash a messy, oily, raw-meat touched bowl/plate/dish!
- Ingredients may be mixed prior to pouring into the zip-lock bag, or mixed after the fact.
- You want to mix all the ingredients together before adding the chicken to prevent the coconut oil from solidifying when it comes in contact with the cold chicken.

2. Add the chicken 
- Mix the chicken around a few times to ensure even coating.
- Let the chicken marinade for at least 3.5 hours.
- I like to first place the zip-locked package on a plate, then into the fridge.

3. Grill the chicken on medium heat
- Tip: line the rack on the grill with aluminum foil (when excessive fat from meat drips down the rack, big flames erode and the grill gets really smokey... not very pleasant when grilling on the porch AND your neighbor's porch is three feet away).
- Cook (covered) on the grill for a few minutes on each side.
- Half way through, sprinkle some coconut flakes if desired.
- Cook a few more minutes until thorough.

4. Chop, plate, and eat!
- Garnish with coconut flakes if desired.
- Tastes great with rice!

The soy sauce gives this chicken an Asian flair to it, but only to an extent. The hint of coconut is subtle, but tasteful, and not overpowering. Marinading is easy; deliberating what to use in the marinade is the tough decision. Try this simple chicken marinade and deliberate no further!

Watch my video and join me in my kitchen where everything is served with love.


♥ Yen

Saturday, August 25, 2012

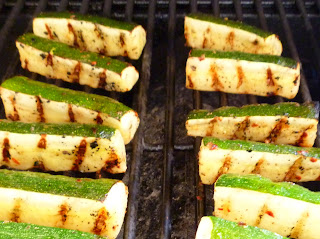
Grilled Zucchini

Zucchinis love my grill, and my grill loves zucchinis. Zucchinis are so versatile; they can be cooked, prepped, and eaten in so many different ways. My favorite way to have them is to have them grilled. I toss them with a little seasoning and let the grill work its magic.


Base: 3 large zucchinis (not the extra-large ones, just large)
Flavor: oregano, powdered garlic, crushed red pepper, white wine vinegar, salt, pepper, and oil
Method of Heating: grilling

Prep work:

1. Cut each zucchini into 8 pieces
- cut off both ends (the mouth and the tail)
- then cut in half widthwise
- then take each half and cut into quarters (lengthwise)

2. Seriously, I only want to toss them lightly in seasoning
- little bit of oregano, powdered garlic, and crushed red pepper
- white wine vinegar for a pop of acidity-- I'm not a vinegar-y person, but I find that white wine vinegar is pretty amiable; we get along because the vinegar flavor and smell is more subtle
- some oil to keep it moisturized
- salt and pepper to taste

3. Seriously, I only want to toss them lightly in seasoning
- no need to marinade for long
- preheat the grill, when ready, marinade is ready too!


 I let my zucchinis mingle on the grill until they are tender, because I prefer it that way.


Good dish for non-meat eaters. Good side dish to pair with chicken, beef, pork, fish, and more. Never disappoints. Good stuff! Watch my video and join me in my kitchen where everything is served with love.


♥ Yen

Thursday, August 23, 2012

Why You Need to Go to Farmer's Market


I went to the downtown farmer's market in my local area for the very first time the other day. I know, I can't believe it either-- did I really say I went there for the first time just the other day? Yes, sadly, I really just said that. However, it does not mean I've been shielding myself from farmer's market all this time. For the past few years, I've been going to smaller farmer's markets that are located closer to me. They had what I needed, and I was satisfied with the prices, so why not save gas money and avoid the hustle of the downtown bustle? That was my reasoning.

Now, I have opened my eyes, and I see the world beyond itsy-bitsy-teenie-weenie farmer's markets. My downtown's farmer's market is like a massive-admission-free-outdoor convention. There are countless stands/booths and 7 out-of 10 of them offer free samples. The booths are very diverse and there are a variety of products being showcased. You will find the common farmer's market offered vegetables, fruits, jam, salsa, bread, etc. You will also find atypical booths: doggie goodies, body art (Henna tattoos), caramel popcorn, garden decor, and more. You will also be able to take a trip around the world by touring international food booths: Thailand, Mexican, Italian, Caribbean, Greek, Middle Eastern, and more. And just like any massive-admission-free-outdoor convention, there are a ton of attendees. Maybe you're already use to this, as this is typical at farmer's markets in a lot of other areas-- I wouldn't know, because I've only been acquainted with itsy-bitsy-teenie-weenie farmer's markets until now.

Now let's get to why farmer's market is the way to go: it's awesome. Farmer's market provides fresh produce that beat the prices of grocery stores (almost all the time-- 97% of the time). When I say fresh, this is what I mean: I have never had a real peach until I had a farmer's market peach. There is a BIG difference. Ever since I met a farmer's market peach, I always feel like I am overpaying for grocery store peaches. So fresh produce and good prices. Sold! I guess if you have your own garden, you don't need farmer's market-- you could possibly host your own farmer's market.

The day before I went to the downtown farmer's market, I brought a substantial amount of veggies from the grocery store-- shame on me. So here's all that I got on my recent farmer's market visit:


- 3 big zucchinis for $1.50
- 1 loaf of baguette for $3.00
- 1 bag of caramel popcorn for $4.00

Umm... I think I forgot to mention you don't have to pay taxes on your purchases at farmer's market. Thumbs up to another way of saving money! Happy shopping, and support local first.

♥ Yen

Monday, August 20, 2012

Chocolate Covered Strawberries


There are two secret ingredients that I absolutely cannot forsake when I make chocolate covered strawberries: shortening and coconut.

Shortening makes the chocolate smooth and thin. Making chocolate covered strawberries without shortening will result in a thick chocolate shell that is hard to bite into, and takes forever to dry. Shortening makes sure that you get to enjoy a decent amount of chocolate AND strawberry; unless you want a higher chocolate : strawberry ratio.

After my friend introduced me to coconut chocolate covered strawberries, I can never go back to chocolate covered strawberries without coconut! My friend uses white chocolate that already contains coconut. She tells me that it's not easy locating them, as they are only sold at select grocery stores-- and they don't always have them in stock. I just use white chocolate morsels and unsweetened coconut flakes: it provides more flexibility to get fancy and decorate with it.


Chocolate covered strawberries are a bit pricey when you buy them already made. Learn how to make them better homemade, and never overpay for them again! You know what my secret ingredients are. Now, see what my tips are. Join me in my kitchen where everything is served with love. Watch my video here:


♥ Yen

Sunday, August 19, 2012

Eat, Cook, Love

I'm not a professional; I'm just a girl who loves to eat, and who loves to cook :)

I can't say that I've had the fortunate opportunity to travel to different countries and collaborate with chefs around the world. What I do have, are active taste buds that have been introduced to a plethora of flavors, cuisines, and exotic foods. They are friendly taste buds that only dislike two food items-- but even then I still eat them, just not in excess. Therefore, I think I can say that my taste buds are very "well-rounded."

I also have a very needy gut that cannot be neglected. You will never hear me say: I forgot to eat lunch, I haven't eaten anything today (and it's 6PM), there wasn't anything to eat, or any of that nonsense. I am extremely talented when it comes to eating and simultaneously doing another task. Eating + simultaneously doing something else, is the strongest multitasking skill which I have mastered. If you know how to operate a stove, oven, grill, microwave, fridge, toaster oven, etc., the rest comes easy (maybe with a little trial and error here and there). With that said, there's always something to eat (if you are fortunate to afford to eat-- sadly, food is not a luxury to all).

I have a great appreciation for food (girls splurge on make-up and shoes, I choose food), and an even deeper appreciation for the loving soul(s) who puts his/her blood and sweat into preparing food... just not literally. On cooking shows, I have seen a water fountain of sweat running from the chef's forehead down to the food-- extra seasoning-- not cool.

I enjoy eating out, but I also enjoy cooking at home. When I dine out and I experience a dish/flavor that I really admire, I have a desire to recreate it in my kitchen. At the same time, when I dine out and I taste a dish/flavor that did not meet my expectations, I have a strong desire to make it better in my kitchen. I have to thank good chefs and not-as-good chefs for my inspiration to cook; a good chef's triumph is my inspiration, and a not-as-good chef's demise is also my inspiration.

And that's why I like to cook. I can't always have things my way in life, but I can always have things my way as the chef in my kitchen. I started my YouTube cooking channel to share the adventures in my kitchen. I'm not the world's greatest chef, but I like to think that I'm up there somewhere in the book :)

Subscribe to my channel and join me in my kitchen were everything is served with love.

My YouTube Channel: LetsGetCookinggg

Yen
Related Posts Plugin for WordPress, Blogger...